
Tutorial in 3 steps: [First Layer] [Second Layer] [Third Layer]
(German) (English)
 After showing how to solve the bottom and middle layer of the Rubik’s Cube in the first two parts of this tutorial, now the third and last part explains
 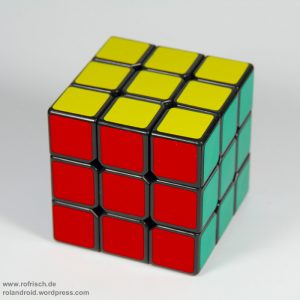 how to solve the remaining third layer that contains all pieces with yellow sides.
There are only 4 steps left until the cube is fully solved:
- Turn the yellow edges so that they are oriented correct
- Position the yellow edges at their correct places
- Turn the yellow corners so that they are oriented correct
- Position the yellow corners at their correct places.
Note: The steps 3 and 4 can also be done in different order. That’s how I explained it some years ago. But it was more to learn and also not consistent with the CFOP speedcubing method that you might want to learn later. That’s why I show now how to orient the corners first and after that how to position them.
3. The Last Layer (yellow)
As I did for the first two layers, I also try here for the last layer to show a solution that has not many long move sequences to learn. Also I try to show algorithms that are also useful if you like to go on with speedcubing and the CFOP method.
But before that we start with the 4-steps solution that I described above. Let’s go. The white layer and the middle layer are already solve, now to the third layer:
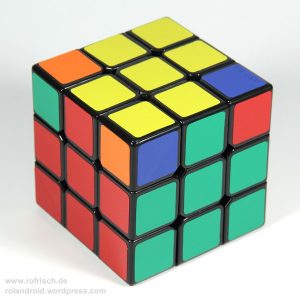
3.1 The Yellow Cross
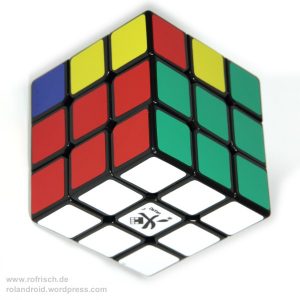
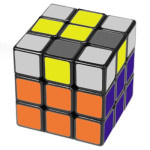
 Our first goal is to make a yellow edge cross, like you see on the picture. In this step we do not have to care about the position of the yellow edges. Also it doesn’t matter if some of the corners are yellow, too. Here it’s only important that all yellow sides of the edges show to the top.
We have 4 different starting positions. If the first two layers are solved, you see 0 or 2 or 4 edge pieces showing yellow to the top. If these are 2, then the two can be in adjacent or opposite position. Let’s start with these 2 cases.
 Yellow edges in a row
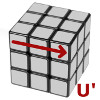
If you have two opposite edges showing yellow to the top, then they build a row together with the center piece. Then you have to hold the cube in the shown way that this row or line goes horizontally across the upper face of the cube. You can turn the whole cube or only the upper face to bring this row to the shown position. And now we need a very simple move sequence. I call it „Fru-Ruf“, but exactly it goes like this:
F R U R‘ U‘ F‘
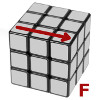
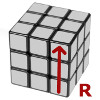
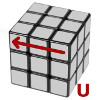
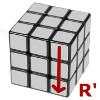
As you see, the name „Fru-Ruf“ describes this algorithm almost completely. You only have to remember that the second half of the move sequence is anti-clockwise. FRU is turning clockwise, and then R’U’F‘ is turning anti-clockwise (see notation). Not very difficult, is it?
This algorithm also changes some of the yellow corners, but here we only look for the yellow cross. That should be okay now – all edges show their yellow sides to the top.
 Yellow edges in a right angle
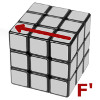
Often you also find the situation where two edges are yellow, but they are adjacent. Together with the center piece they build an angle of 90 degrees. Then we hold the cube as shown, so that this angle looks like a „right turn“ from the front to the right. You could also say it’s like watch hands that show a quarter past six. In this case the easiest way is a simple variation of the „Fru-Ruf“ move:
f R U R‘ U‘ f‘


As you see, it’s almost the same algorithm. Only that we turn a small f at the beginning and end instead of a capital F. If you already learned the notation then you know that this means to turn the contiguous layer, too. You have to turn both front layers, a wide F move (that’s why it sometimes is also written Fw).
 Tip: The cross can also be done without a wide f move. You hold the angle in „9 o’clock“ position so that it is on the opposite side, going from the left to the back. Then you turn F U R U‘ R‘ F‘ (which is Fru-Ruf backwards, Fur-Urf).
Feel free to choose what you like more. I myself use both ways, depending on how the situation looks after the first two layers.
 No edge pieces yellow
If you have the case that there is none of the edges showing yellow on top, then your chances for a new world record are bad. 😉 Then you have to do both algorithms successively. Start with F and then a second time with f:
F R U R’ U’ F’ + f R U R’ U’ f’
If you have done the first alg, then your upper side shows 2 yellow edges. Then go on as described above.
Tip: If you like, you can do the whole cross only with F R U R‘ U‘ F‘. You only have to turn it more often. With every Fru-Ruf the cube changes as follows:
No Yellow > Angle (hold it on 9 o’clock) > Row (horizontal) > Cross
With a maximum of 3 Fru-Ruf you can do the cross if you make sure that the angle or row is in correct postion.
But of course it’s faster with small-f or Fur-Urf.
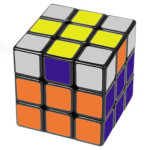 Now the cube should look as shown on this picture. If it was already like this after your first 2 layers, then you were lucky and have skipped one step. The cross is yellow now, but it’s probably not positioned already. That will be our next step.
Note: Maybe you ask yourself why there are always 0 or 2 or 4 yellow edge pieces and never 1 or 3. Mathematicians explain that with parity, but I understood that not completely until now.
Important for us is only: If you have an odd number of yellow eges (on the regular 3×3 Rubik’s Cube), then something is not right with that cube. Maybe it was put together in a wrong way and is „unsolvable“ now (then you can get help here). But maybe you should check out carefully if there is not a wrong piece on the first two layers.
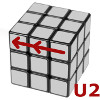
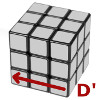
This rule is is also important if you have 3x3x3 „shape mod“ cubes (like Fisher Cube or Barrel Cube or others) that have single-colored edge pieces. Then you can’t see if one of these is in wrong orientation. These cubes are not unsolvable if you see 1 or 3 yellow edges. More about this in the Fisher Cube video linked above.
If you like to see how to make the yellow cross in my (german) video, here it starts:
But we have to go on with the yellow cross. It is oriented right now, but we still have to position it correctly, because presumably some of the yellow edges are above the wrong centers:
3.2 Positioning the Yellow Cross
 Our goal is now to sort the edge pieces correctly so that the yellow cross fits correctly at all 4 sides with the center pieces of the second layer. For that we have to turn the upper layer to test out a position where 2 (or all 4) edges match with the side colors.
If you find a position for all 4 edges, you turn the upper face to that position and then you can skip this step. But 2 edges always match! If anyone claims that in all (4) upper face positions a maximum of only 1 edge matches, then he has not searched carefully enough.
If you found that position where 2 edges match and 2 don’t, then you hold the cube in a way that the swapping edges are in front and left position or in front and back position.
In the first case, where you need to swap 2 adjacent edges: The following move sequence „Sune + U“ swaps the left and the front edge of the yellow cross:
(R U R‘ U R U2 R‘) + U
 +
+
The first seven moves (in brackets) are called „Sune“ (spoken Soo-Ne, not sun). It swaps the two edges. The closing U move brings the cross back in the right positon so that all 4 edges match with the side colors.
At first that move sequence looks complicated, but in the following I show you how to learn Sune very easily.
Later if you go on with speedcubing you will use that Sune alg often, but without the concluding U turn. So it’s best to learn directly, that the last U is not part of Sune. This is also helpful in the following case, when we have to swap 2 opposite edges:
The following move sequence „Sune + U‘ + Sune“ swaps the back edge and the front edge of the yellow cross:
(R U R‘ U R U2 R‘) U‘ (R U R‘ U R U2 R‘)
The both parts in brackets are both the Sune alg. So in summary:
- Sune + U swaps the front and left edges.
- Sune + U‘ + Sune swaps the front and back edges.
With these two variants you can position the yellow cross correctly.
 Tip: Maybe you find it a little hard to memorize Sune. Then the following can be helpful to you:
Sune is easily to keep in mind if you observe the pair of „white“ corner and its corresponding edge that comes out of its slot in the front right with the first turn. Keep your eyes on this pair while you do the Sune moves.
Instead of memorizing the formula R U R‘ U R U2 R‘ you can also memorize it like this:
- Open the front right slot (R)
- Bring that pair to the front left place (U)
- Close the slot (R‘)
- Bring the pair to the back left (U)
- Open the slot again (R)
- Bring that pair back to the front (U2)
- Close the slot with the pair (R‘)
Obviously the pair has to be inside its slot finally; otherwise the first two layers would not be solved anymore. So you simply have to wath that pair doing one carousel round on the upper side of the cube. This is a quite simple way to learn the Sune move.
If you like, you can also watch step 3.2 in the (german) video:
Now only the yellow corners are still unsolved.
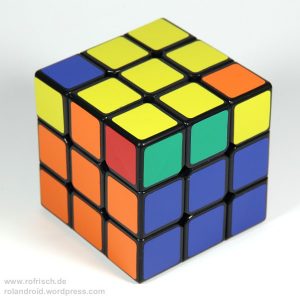
3.3 Turn Yellow Corners (make the whole upper side yellow)
Now there are presumably 2 or 3 or 4 corners not in right orientation. Their yellow stickers show to the sides, but not to the top. If your cube has the complete upper side already yellow, then you can skip here and go to the next (and last) step.
The following move sequence is a little strange because it orients corner by corner, but in the meantime the cube looks almost scrambled. But wondrously everything on the first 2 layers will also be okay again if your last corner comes to the correct orientation.
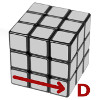
The following move sequence turns always the upper front right corner. When that corner reaches the correct orientation, then we turn the upper face (U, U2 or U‘) and choose the next corner that needs to be oriented. And so on, until all 4 corners are oriented correctly:
(R’ D’ R D) (R’ D’ R D)
 (two times or four times)
The first two turns bring the corner down and then out of the way to the left. So I memorize „down, out, up, in“.
As you will see, you have to do that R‘ D‘ R D two times to twist the upper front right corner one step anti-clockwise. After a second R‘ D‘ R D it is twisted annother step anti-clockwise. So you have to do that move always 2x or 4x – at 6x it is oriented as before.
And then you bring the next corner to the „twisting place“ with a U turn (or U‘ or U2). If that corner is also oriented correctly, then again with the next one. After at most 4 times with that procedure then the upper face of the cube should be completely yellow.
Important: To go from one corner to the next, turn never the whole cube, but only the upper layer.
Note: If you mess up this strange move sequence often, then it is likely that you forgot the last „in“ (D) when doing „down, out, up, in“ before you go to the next corner. That happens easily, because the corner looks fine in place right after the „up“ (R). But it is necessary to do the „in“ also. Otherwise you get chaos on the first two layers. Maybe it’s a good idea to whisper „down, out, up, in“ quietly so that you don’t forget one move.
Annother note: It will never happen that there is only one single corner to be twisted in this step. It is always a minimum of 2 (if not all corners are already twisted). If your cube has only one corner not showing yellow, then it’s in an unsolvable state. Maybe it was assembled wrong, or one corner twisted accidentally during wild cubing. Especially if you have a loose tensioned speedcube this can happen sometimes. Then you have to twist it back manually to bring the cube in a solvable state again. This is not a legitimate move, but also in competitions it is allowed to do once, to repair a corner twist.
If you have solve the cube several times, then you will notice that you have to do the R‘ D‘ R D sequence always 6 times or 12 times alltogether. If there are 2 corners to twist, then the one needs a clockwise turn (4x) and the other an anti-clockwise turn (2x). If the cube shows 3 wrong edges, then all go in the same direction (6x or 12x). And with 4 corners it’s 2 clockwise and 2 anti-clockwise (12x).
This means that clockwise turns need double moves, because the corner goes two times anti-clockwise (what shows the same result).
So it would be helpful to have a move that twists the corner clockwise in one step. This can be done with D‘ R‘ D R („out, down, in, up“, the backwards version of R‘ D‘ R D). Instead of twisting two times anti-clockwise (4x R‘ D‘ R D) you do only one time clockwise (2x D‘ R‘ D R). After a short time you will see from the yellow face of the sticker directly if it needs a clockwise or anti-clockwise turn and what algorithm brings you faster to your goal.
Both versions of that move are shown here in my german video:
Now, after having all corners oriented correctly, it’s time for the final:
3.4 Position Yellow Corners
 If your Rubik’s Cube was not solved coincidentally at the last step, then you have only to swap 3 or 4 corners now. This is almost similar to the step before. Only that we have 2 different move sequences that alternate: „down, out, up“ and „down, in, up“.
Also these algorithms refer to the upper front right corner. And from one corner to the next you also go only with a turn of the upper layer (U, U2 or U‘) and never by turning the whole cube.
You begin by bringing a yellow corner that stands between wrong edges to the upper front right „exchange place“. Then you bring it to a waiting position bottom front-left with the following move sequence:
R’ D’ R („down, out, up“)
Now hold the colors of the corner parked on the bottom left in your mind, for example green-red(-yellow). You don’t need to remember yellow, because all corners that we swap now have a yellow side.
Nowwe turn the upper layer of the cube with U or U‘ or U2 into the position where the yellow-red and the yellow-green edge are standing at the front and right side. The place where the parked corner has to go is now at our „exchange place“, because it needs to be brought between these two edges. The following move brings it there. We ignore the fact that this kicks annother yellow corner out:
R’ D R („down, in, up“)
Now you have brought the first yellow corner between its proper edges. Now you turn the upper side of the cube again with U, U‘ or U2 until you found the next yellow corner that still is between wrong edges. Important: Don’t take the white corner by mistake that came to the upper layer temporarily.
The same procedure repeats now. If the next yellow corner that still is between wrong edges, is at the „exchange place“, then you park it again with „down, out, up“ at the parking position (bottom left). Then you turn the upper side again, look for the place with the fitting edges and bring the parked corner there with „down, in, up“.
If you need to swap 3 corners, then you need two of these cycles. And if you need to swap 4 corners, then three cycles are needed. Sounds weird, but that’s how it works. If the upper layer is completely solved, then you have to adjust it with the two bottom layers – otherwise you get 2 seconds penalty. 🙂
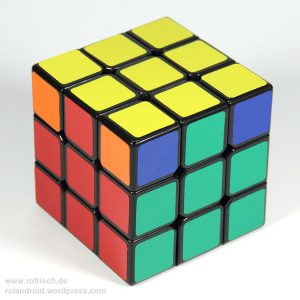
Now your cube should be completely solved. Congratulations!
Maybe the (german) video for the last step can help you, too:
Okay, that were my explanations to solve the first, second and third layer of the Rubik’s Cube. Maybe one day I make new videos, but I guess they will be in german, too.
If this tutorial helped you to solve the 3x3x3 cube (or if helped you to learn a better beginner’s method), then I would love to read some nice comments here. Of course you can also tell me about errors or improvement suggestions, etc. At the end of this site you can type your comment. Thanks!
Tutorial in 3 steps: [First Layer] [Second Layer] [Third Layer]
(German) (English)
Pingback: Rubik’s Cube Beginner Method, Part 1: First Layer (white) | Rolands Zauberwürfel-Blog – freshcuber.de
Pingback: Rubik’s Cube Beginner Method, Part 2: Second Layer » Rolands Zauberwürfel-Blog - freshcuber.deRolands Zauberwürfel-Blog – freshcuber.de
Pingback: Zauberwürfel-Anfängerlösung Teil 3: Dritte Ebene (gelb) » Rolands Zauberwürfel-Blog - freshcuber.deRolands Zauberwürfel-Blog – freshcuber.de