
Tutorial in 3 steps: [First Layer] [Second Layer] [Third Layer]
(German) (English)

Hello, my name is Roland Frisch and I am a quite slow german speedcuber who has much experience in teaching beginners how to solve the Rubik’s Cube. I publish this beginner’s method since 2012. The german version is the most popular article of my blog and has more than 100.000 views per year. And it’s always improved if my experiences with cube workshops show me a better way to explain certain things.
With this article I start a new era of freshcuber.de, the first article in english. My website will stay mostly in german, but I was asked several times to do at least the beginner’s tutorial for the 3x3x3 cube in english. Please note that english is not my native language, and so please excuse any mistakes I make in spelling or grammar. I think it’s understandable at least. If not, please tell me. And now let’s start:
NEW (November 2020): I made a new video (in german) for this beginner’s tutorial. All steps in one video:
 Here I like to show „my“ beginner’s method for the standard Rubik’s Cube (3x3x3). This way to solve it is mostly intuitive so that it is easy to learn and to remember. I tought it in many beginner’s workshops since 2017 and optimized it several times. Also the different steps are made in a way that it is easy for beginners to switch later to the CFOP speedcubing method.
- Here in Part 1 we do the first layer: the white edges and the white corners.
- When that is done, Part 2 shows how to finish the second layer.
- At last we do Part 3 with the last layer that contains the yellow edges and the yellow corners.
There is a 2 sided printout of this beginner’s method, but unfortunately it’s only in german (until now). You can download and print it, and it shows you the main steps and its algorithms.
Rubik’s Cube basics
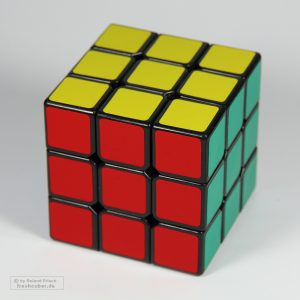
 Before you start to solve the Cube you might become familiar with its construction. For that it’s useful to have a look inside.
 As you can see there are three different kinds of pieces:
Center pieces (with 1 color),
Edge pieces (with 2 colors) and
Corner pieces (with 3 colors).
And however you turn the cube: Center pieces always stay as center pieces, Edge pieces always are edge pieces and also do the corners. It is impossible that for example an edge piece goes to a corner position. There are no „hidden colors“ inside. I think that’s obvious and clear, but it helps to think a few seconds about that. I saw many beginners who desperately tried to bring a corner piece to an edge place.
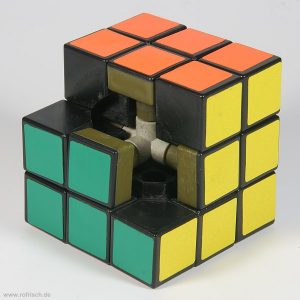
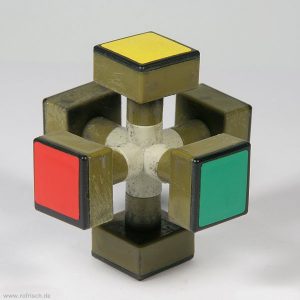 Annother important thing is also easy to understand if you look at a disassembled cube: The center pieces cannot change their positions because they are connected. So white always stays opposite yellow and so on. Centers can be turned at their place (and they take edges and corners with them what mixes them up) but they can’t swap their places because they are connected by axes.
The common color scheme is:
- White opposite of Yellow
- Red opposite of Orange
- Green opposite of Blue
- When white is on the bottom than green is right from red.
But even if your 3x3x3 magic cube does not follow this color scheme it can nevertheless be solved with this beginner’s solution.
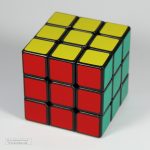
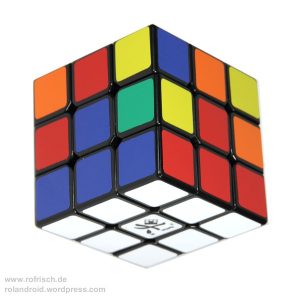
 From this construction of different axes it follows that you can see directly from the center piece which color belongs to which side.
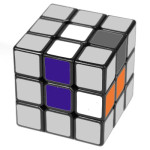
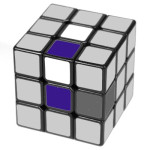
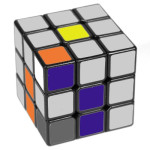
The right side of this scrambled cube is the „green side“ even if there are more blue than green pieces. And the upper side is the „red side“ even if there is only one red piece. It’s not a democratic decision but the center piece alone decides here.
And now we start. If your cube is not mixed up already you should now scramble it completely. And then we begin like this:
1. The first layer (white)
For beginners on the 3×3 cube I recommend to start not color-neutral but to start always with the white side, then do the middle layer and at last the third layer (yellow). The nice thing is: The first two layers can be solved mostly „intuitive“ – you don’t have to learn long algorithms for that.
One advantage if we start always with white is that we learn the order of the „middle“ colors easily (red, blue, orange, green) and that we see easily if one piece belongs to the first („white“), second (not white or yellow) or third („yellow“) layer.
1.1 The White Cross
At first we solve the edge pieces of the white layer, this means the four (two-colored) pieces that have white and one other color. These four edge pieces have to be placed around the white center piece so that they all together show a white cross.
Here in the beginner’s tutorial I explain it with the white side on the upper side of the cube. Advanced speedcubers build the cross on the bottom side, but I think for beginner’s it’s easier to hold white on top for the white cross.
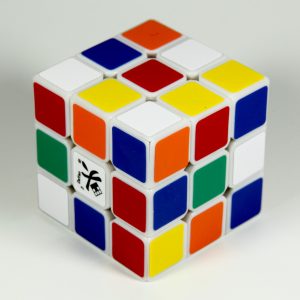
 If you solve the white cross you should try to bring each white edge piece next to its proper place so that its colors match with both adjacent center colors. You see it well in the picture: The blue-white edge piece is next to the white center, but also next to the blue center. The same with the orange-white edge piece that is placed betwenn the orange and white centers. You can’t see it for the othe two centers here, but you can believe me.
The four „white edges“ (that means the for edges containing a white field) have to be moved intuitively on their places on the „white side“ (the side with the white center piece), without any specified move sequences. Try it out, it’s not too complicated even for beginners.
In case you get a white cross that does not fit perfectly at all centers of the side faces: I show you at the end of this segment how to correct that. But at first I give you some hints that might be helpful to get the white cross done:
White edge on the middle layer
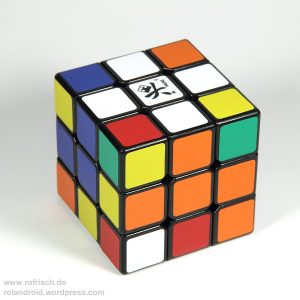
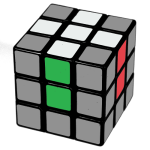
Every edge piece can be moved in two different directions from its place – with a turn around one of the two adjacent center pieces. The white-orange edge on the following picture could be turned to the upper side with a turn around the blue center or the orange center (the front side or the right side). It will decide if the edge comes with the white face next to the white center or in the wrong orientation..
 If the white edge is on the middle layer as shown and I want to turn it to the upper face of the cube then at first I have a look which of the two possible turns would bring the white side of the edge next to the white center. But I don’t do that directly, but first I turn the white layer so that the right place for the edge is there where the edge will be turned.
In this example: If I want to solve the orange-white edge I make sure that it lands right from the blue-white corner (if that is already solved). After I positioned all four white edges in the right order, then I can adjust the white cross in that position where it fits with all 4 side colors blue, orange, green, red. If not, then I have swapped two edges by mistake.
White edge on the opposite (yellow) layer
If the white edge is on the bottom layer, we have two possibilities. If its white side is on the bottom, next to the yellow center, then it’s very simple: Turn it by 180 degrees to the top, and its white side will be positioned next to the white center. But before that you should take care that it comes to the top at the right position. So you should turn the upper side or the bottom side that the white edge goes upside at the right place.
 In case the white edge piece is on the bottom layer in a way that its white side does not sit next to the yellow center, then unfortunately it could not be positioned right in a single step.
In that case you bring it to the middle layer with a quarter turn first, and then you bring it to the upper layer in the right positioin (as described above).
White edge wrong orientated on the upper layer
 Of course it could also be the case where the white edge is already on the upper (white) layer, but it’s orientated wrong (so that it has the ‚colorful‘ side next to the white center). Then you simply turn it back to the middle layer and from there you bring it again to the top, but in the right way. Maybe it’s best to leave such an edge as last of the white cross – because it often happens that it comes down automatically when you position the other white edges.
These are the basics for the White Cross. As I mentioned before: With a little try and error you find out intuitively how to do the White Cross. There is noch much to mix up at this first step.
Tip: If you have already a little experience with the white cross than you should try to do it in 7 or 8 moves. And if you manage to plan it before you start first turn then you have done a big step towards speedcubing. There you have 15 seconds before your solve to plan the cross, so that good speedcubers have finished it in 1 or 2 seconds.
But in the beginning it is quite confusing to make the white cross. And actually I think it is the most complicated step of the whole solution because there is no step-by-step instruction. Every time the situation is a little different.
To make the white cross a little easier I tought the „daisy flower“ trick for some years as an interim step. You can find it in german here. But easier and better it is done this way:
If necessary: Correcting the order of the white edges
 Whoever has done a white cross that unfortunaletely does not match with all 4 centers on the middle layer can correct it like this:
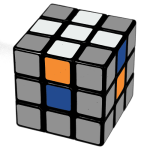
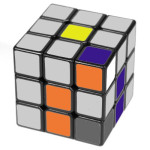
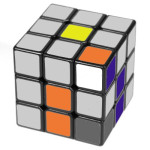
At first you have to turn the upper layer until you find a position where the white cross fits on 2 centers on the side. Even if it does not fit on all 4 sides, it always fits on 2 sides. Whoever says it matches with no center or only with one has not tried al 4 positions. So turn the white cross by 90 degrees and look again. And turn again if it still does not match with 2 sides. Somtimes you will find it matching with 2 adjacent sides (as shown) and sometimes it fits on 2 opposite sides.
The pictures show the cross being okay on red and green, but the orange-white edge piece has to be swapped with the blue-white edge piece. And that can be done with the „hospital elevator“:
Maybe you know that: Some multistorey builings have elevators that don’t stop at every storey. Imagine a hospital that has such elevaters. The blue patient has taken the wrong elevator and came to the orange station. And vice versa the orange patient who unintentionally came to the blue station.
What does the „blue patient“ have to do now? He rides back to the ground floor, looks there for the right elevator and takes this one for his ride to the right station. And the „orange patient“ does it the same way.
If you hold the two edges that have to be swapped as shown (right and front), then you can follow the arrow graphics and notation of the different moves. But it is more important that you understand the principle. Then you also know what do if two opposite edges have to be swapped (red and orange. Or green and blue).
Here’s what you do if you transfer the idea of the 2 elevators on the cube:
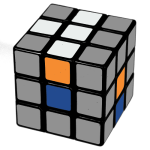
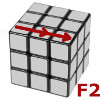
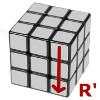
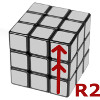 The white-blue edge rides downstairs to the ground floor by turning the side with the orange center two times (double turn, 180 degrees). It is now again on the bottom layer.
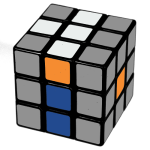
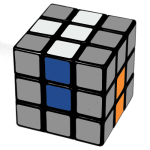
 There the „blue patient“ looks for his right elevator. So you turn the bottom layer until this blue-white edge comes to the position under the blue center.
.
.
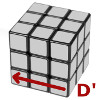
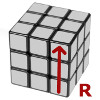
 The blue elevator is the right one for the blue patient. So we turn the front side around the blue center 2 times (double turn) until the blue-white edge has reached its right place.
.
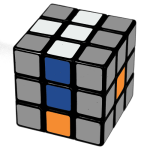
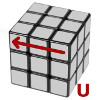
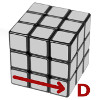 Meanwhile also the other lost patient, the orange-white edge, has reached the ground flor. There is looks for his right elevator. So you have to turn the (yellow) bottom layer until you have positioned the orange-white edge under the orange center piece.
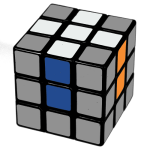 With that orange elevator the second patient now can also reach his station by doing a double turn around the orange center. Now also this edge is at its correct position between the white and orange centers. Both edges have swapped their places.
As I mentioned we have to do the same when we have to swap two opposite edges, for example front and back. Then we have to do double turns („D2“) also on the „Down“ side.
Not matter if you had to use the „hospital elevator“ correction or not: Now all white edges should build a correct white cross that also matches with all 4 center pieces on the sides. Then we are prepared for the second step on the first layer:
1.2 The White Corners
 In the beginner’s method the next step after the White Cross is to finish the first layer by inserting the „white corners“ (the 4 corners that have a white sticker or field).
At this point it’s a very good idea to flip the whole cube. From now on the yellow side is on top and the white side at the bottom. Maybe this feels strange at first, but it is more important to see the unsolved pieces than the already solved ones. On this picture we watch from the bottom against the white side to see the goal of this segment: The white side will be completely finished and also its borders are fine and match completely with the 4 center pieces of the side faces. We have not only done the first side, but the first layer of the Rubik’s Cube.
Tip: Whoever has a little experience with the beginner’s method can change here to a „shortcut“ and solving the bottom corners together with its corresponding edges of the middle layer. This is called F2L (First 2 Layers) and I explain it in german in a separate tutorial.
But at first it makes sense to learn how to solve the first two layers separately. This is also useful later, for example if after the cross there is a white corner already in its place. So we have to learn the white corners now.
If you find a corner with white on the upper face of the cube (yellow center), then turn the upper layer so that this corner comes to stay above its right place. For example, if you have the white-blue-red corner on the upper side you turn the upper side until the corner is above the blue and the red center. Then you hold the cube in that way that this corner is in upper front right position.
Now there are 3 possibilities how this corner can be oriented. It can show its white field to the side (right) or to the front or to the top.
White side at the right
 If the wide side of the corner is on the right, then you have the easiest case. You only have to turn the right side clockwise, then you turn the upper side clockwise. And then you turn the right side back (anti-clockwise) to close the „slot“ you have opened with the first move. If you already know the notation then it’s R U R‘
It’s best if you do all these 3 moves with your right hand. See next section.
White side in front (or left)
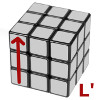
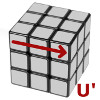
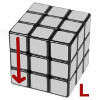
 If the white side of the corner is at the cubes front, then we turn the whole cube clockwise
 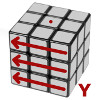 (this move is called Y), so that the corner now is in the upper left front position and its white sticker is on the left. Now we have exactly the mirrored situation, so with L‘ U‘ L the corner can be brought to its place.
How can you recognize fast if you have the right or left version of that move? In both cases the white sticker is showing to the side, marking the hand that has to do the move. The R U R‘ version is best done completely with the right hand. And the L‘ U‘ L with the left hand. If you cube turns smoothly you can do that U or U‘ turn very elegant: You pull the backside corner to the front with the index finger of that hand (see also the german article Fingertechnik).
These two little algorithms R U R‘ and L‘ U‘ L can also be remembered by the steps „open, pull in, close“. At first you open the „slot“ (which is the place for the bottom corner and the edge above it) where the corner has to come in. This opening of the slot brings also the corner to the back of the cube. But then you pull it in the slot by turning the upper side. The third move „close“ brings it then to the right position and also repairs the white cross.
As long as the white side of a corner is not showing to the top it is quite easy to insert the corner.
Tip for cubers with a little more experience: If you have the shown situation with the white sticker at the front right position, then you can do (instead of Y + L‘ U‘ L) also try one of the following variants. Check it out which one you prefer, or use them all 3:
- U R U‘ R‘ – „SexyMove backwards“ (see following explanation).
So you move the corner to the side, open the right slot, put the corner in and close the slot. - R‘ F R F‘ – called „Sledgehammer“. You hit the corner to the bottom at first. And then you bring it to the left on a secure place. After that you restore the white bottom face.
These two moves are especially useful if you see that the white corner already has found its corresponding edge. Then this pair of corner and edge stays together and is brought into place together. That’s basically what is called „F2L“.
 White side on top
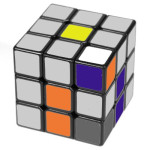
The third case is only a little more complicated: when the white side of the corner is showing to the top. Then you do R U2 R‘ U‘ – and that will orient the corner perfectly so that we have our first case with the white side on the right. So you can insert it with R U R‘.
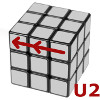
So you open the right slot, pull the backside corner twice (that U2 move brings the white corner to the left), then you close the right slot and bring the white corner back again above its slot. Now it’s positioned perfectly to be inserted with R U R’ as explained before.
With that knowledge it should be possible to solve the complete first layer of the Rubik’s Cube. If you don’t find any more white corners on the upper side because these are at the wrong place and/or in the wrong orientation on the bottom layer, then you have to bring them on top by inserting a random yellow corner. Then you can insert the white corner at the right place and in right orientation.
The 3x3x3 basics and how to solve the first layer are also explained in this part of my video in german:
Now with the finished first layer we can start with the middle layer in part 2 of this Rubik’s Cube tutorial.
Tutorial in 3 steps: [First Layer] [Second Layer] [Third Layer]
(German) (English)


")


")


")


Pingback: Rubik’s Cube Beginner Method | freshcuber.wordpress.com
Pingback: Zauberwürfel-Anfängerlösung Teil 1: Erste Ebene (weiß) | freshcuber.wordpress.com
Pingback: Zauberwürfel-Anfängerlösung Teil 3: Dritte Ebene (gelb) | freshcuber.wordpress.com
Pingback: Zauberwürfel-Anfängerlösung Teil 2: Zweite Ebene | freshcuber.wordpress.com
Pingback: Zauberwürfel-Anfängerlösung Teil 1: Erste Ebene (weiß) | freshcuber.wordpress.com
Pingback: Zauberwürfel-Anfängerlösung Teil 1: Erste Ebene (weiß) | Rolands Zauberwürfel-Blog – freshcuber.de
Pingback: Rubik's Cube Beginner Method, Part 3: Third Layer (yellow) » Rolands Zauberwürfel-Blog - freshcuber.deRolands Zauberwürfel-Blog – freshcuber.de
Pingback: Rubik’s Cube Beginner Method, Part 2: Second Layer » Rolands Zauberwürfel-Blog - freshcuber.deRolands Zauberwürfel-Blog – freshcuber.de