
Tutorial in 3 steps: [First Layer] [Second Layer] [Third Layer]
(German) (English)
 If you have already solved the first layer of the Rubik’s Cube (white side with its surrounding, see right picture and part 1 of this tutorial), then you can go on here in part 2 with the middle layer before part 3 describes how to solve the last layer.
2. The middle layer
Now we have to solve the middle layer of the cube where all pieces go that have neither white nor yellow stickers. This middle layer goes round the Cube like its equator on the red, green, orange and blue side.
As you can see, this second layer is already half done before we started with it, because it contains only 4 unchangeable centers and 4 edge pieces (the 4 edges without white and without yellow). The center pieces are already at their places, aligned with the bottom layer. So we have only to learn one single move sequence that brings an edge piece from the top layer to the right place between to centers of the middle layer.
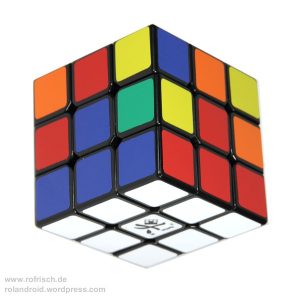
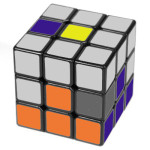
 This picture shows our goal: The white layer and the adjacent layer are both solved – so to say all pieces that don’t have yellow stickers. On the top layer there is still chaos, but the two layers under it are solved.
At first we look on the upper layer and search for an edge piece that has no yellow on it – which means it has to go on the second layer. To bring an „unyellow“ edge piece from the upper layer to the right place on the middle layer we go on as follows:
At first we bring this edge piece above the center piece with the appropriate color. For example if we want to insert the orange-blue edge piece between the orange and blue center pieces, we turn the upper face so that the edge is above the center with the same color. Depending on how the edge is orientated it can be the orange or the blue center. Now we hold the cube so that this is our new front side (yellow remains on top).

 With a quarter turn of the front side to the right or left (clockwise or anti-clockwise, F oder F‘) it could now theoretically be brought to its correct place. But we don’t do it in this way, because that would destroy the solved first layer. So we let it stay on the top layer above its center. But we use this thought to decide how we have to go on: Does it belong to the left or to the right side?
Inserting the edge to the left
If the correct place for this edge is on the left, we go on like this:
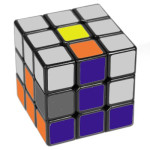
 With U‘, which is a quarter turn of the upper side anti-clockwise, we bring it away from the place where it should be inserted. It’s now almost opposite of its target. For example, if its upper sticker is orange, we bring it over the red side of the cube. If its green sticker shows to the top, then we bring it above blue, etc.
Beginning with this starting position we do the following:
We open the left slot (L‘), pull the back (yellow) corner to the front (U‘), close the slot again (L) and position the white corner that came to the top layer back on top of its slot (U). Then we turn and re-grip the cube (Y‘, this means a quarter turn anti-clockwise) and make the same „open slot, pull, close slot“ again, but now with the right hand (R U R‘). If you like it all together as one algorithm: (L‘ U‘ L U) Y‘ (R U R‘)
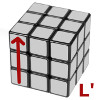
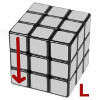
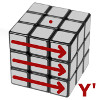
Of course you can simply learn that whole move sequence, but I think it’s easier to memorize if you whisper (or think): „Open left slot, pull corner to front, close slot, bring white corner back, turn/re-grip and right-insert the white corner“.
If it worked out fine, the edge piece is now at its solved position.
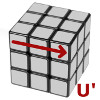
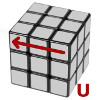
Inserting the edge to the right
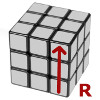
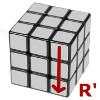
Second case: If the correct place for this edge is on the right, we go on like this:
With U, which is a quarter turn of the upper side clockwise, we bring it away from the place where it should be inserted. It’s now almost opposite of its target. For example, if its upper sticker is blue, we bring it over the green side of the cube. If its red sticker shows to the top, then we bring it above orange, etc.
Beginning with this starting position we do the mirrored version of the first move sequence:
We open the right slot (R), pull the back (yellow) corner to the front (U), close the slot again (R‘) and position the white corner that came to the top layer back on top of its slot (U‘). Then we turn and re-grip the cube (Y, this means a quarter turn clockwise) and make the same „open slot, pull, close slot“ again, but now with the left hand (L‘ U‘ L). Together as one algorithm: (R U R‘ U‘) Y (L‘ U‘ L)
Of course you can also learn this complete move sequence, but I think it is easier to memorize the procedure: „At first bring the edge away from its target, then open the slot on the target side, then pull the back edge, close slot, bring the white corner above its slot, turn/re-grip and then with the other hand: open, pull, close“. If you memorize it in such a way it’s side-neutral, it works on the right and on the left side.
If it worked out fine, the edge piece is now at its solved position.
With these two variants you should be able to bring every „unyellow“ edge from the top layer to the correct spot on the middle layer. In case you have only yellow edge pieces on the top layer you have to bring a yellow edge to the middle layer with one of these move sequences, and that brings the wrong positioned „unyellow“ edge to the top.
This should be enough to solve layer 2 of the Rubik’s Cube. It is now 2/3 solved. Speedcubers call that „F2L„, First Two Layers, and they do both steps together. The explanations for the second layer start here in my german video:
Now with both the first layer and the second layer solved, we go on to the last layer that contains all pieces with yellow stickers. I explain it in part 3 of this tutorial.
Tutorial in 3 steps: [First Layer] [Second Layer] [Third Layer]
(German) (English)
Pingback: Rubik’s Cube Beginner Method | freshcuber.wordpress.com
Pingback: Zauberwürfel-Anfängerlösung Teil 2: Zweite Ebene | Rolands Zauberwürfel-Blog – freshcuber.de
Pingback: Rubik's Cube Beginner Method, Part 1: First Layer (white) » Rolands Zauberwürfel-Blog - freshcuber.deRolands Zauberwürfel-Blog – freshcuber.de
Pingback: Rubik's Cube Beginner Method, Part 3: Third Layer (yellow) » Rolands Zauberwürfel-Blog - freshcuber.deRolands Zauberwürfel-Blog – freshcuber.de